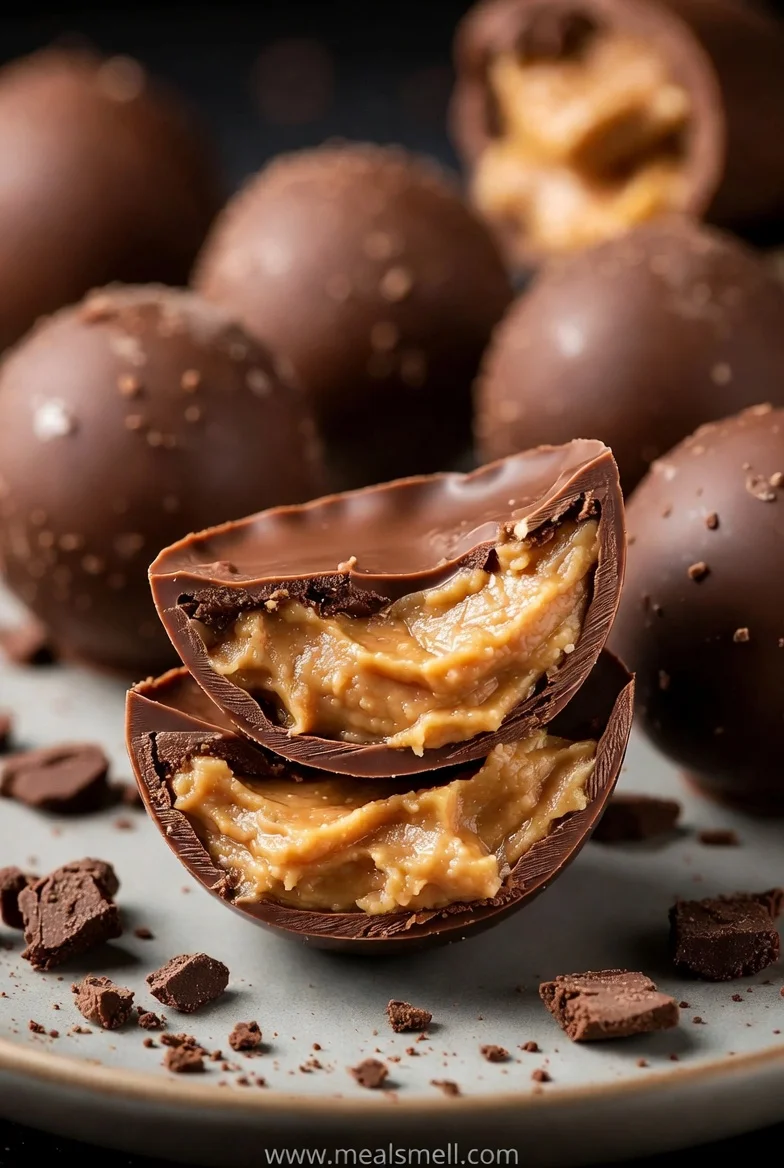
Introduction to Homemade Peanut Butter Eggs
Nothing beats the smell of a fresh jar of peanut butter hitting the air.
It takes me back to sneaking spoonfuls from the pantry after a long workday.
Those store-bought chocolate treats in the yellow wrappers were always my childhood favorite.
However, making your own Homemade Peanut Butter Eggs is a total game changer for any guy.
You get that perfect ratio of salty, creamy filling to thick, snappy milk chocolate.
This recipe is incredibly fast and honestly much better than anything from a gas station.
It is the ultimate way to impress your family without spending hours in the kitchen.
Why You’ll Love This Homemade Peanut Butter Eggs Recipe
My favorite part about this snack is how it respects your limited free time.
You don't have to be a master pastry chef to nail the flavor profile.
These Homemade Peanut Butter Eggs offer a rich, authentic taste that pre-packaged candy simply lacks.
It is a no-bake win that keeps your kitchen cool and your stress levels low.
Plus, seeing your kids' faces light up when you reveal these treats is pure gold.
Ingredients for Homemade Peanut Butter Eggs
Gathering your supplies is the first step toward candy-making greatness in your own kitchen.
I always suggest using high-quality ingredients since there are only a handful of items involved.
You probably have most of these staples sitting in your pantry right this second.
Check the bottom of this post for a printable card with the exact measurements.
The Creamy Peanut Butter Base
Standard creamy peanut butter works best here because it provides a smooth, consistent texture.
I usually avoid the "natural" oils-on-top versions as they can make the dough greasy.
Unsalted butter adds a velvety richness that helps the filling hold its shape perfectly.
Make sure your butter is softened so it incorporates without leaving any stubborn lumps.
Sweeteners and Flavor Enhancers
Powdered sugar is the secret weapon that transforms peanut butter into a moldable dough.
It dissolves instantly, ensuring your Homemade Peanut Butter Eggs never feel grainy or sandy.
A splash of vanilla extract adds a warm depth that rounds out the sweetness.
Don't skip the pinch of salt, as it makes the chocolate flavor truly pop.
Choosing the Right Chocolate for Coating
Milk chocolate chips are my go-to for that classic, nostalgic candy bar experience.
If you prefer a more sophisticated bite, dark chocolate is a fantastic, moody substitute.
I often add a little vegetable oil to the melt for a glossy finish.
This optional trick helps the chocolate flow smoothly over the chilled peanut butter centers.
How to Make Homemade Peanut Butter Eggs
I remember the first time I tried making candy for my buddies during a game night.
I was terrified of ruining the chocolate, but this process is actually quite forgiving.
You just need a little patience and a big mixing bowl to get started.
Follow these simple steps to master your Homemade Peanut Butter Eggs from scratch today.
Step 1: Mixing Your Creamy Peanut Butter Filling
Grab your largest mixing bowl and toss in the peanut butter and softened butter.
Add your powdered sugar, vanilla, and that crucial pinch of salt to the mix.
Stir everything together until a thick, workable dough starts to form in the bowl.
It should feel like playdough—not too sticky, but definitely firm enough to hold shape.
If it feels too soft, just add a tiny bit more sugar to tighten it.
Step 2: Shaping Your Homemade Peanut Butter Eggs
Line a large baking sheet with parchment paper so nothing sticks to the surface.
Scoop about one tablespoon of dough and roll it into a smooth, round ball.
Gently flatten the ball and taper one end to mimic a classic egg shape.
Don't worry about perfection; a rustic look proves these are truly no-bake dessert wins.
Space them out evenly on the tray to give them plenty of breathing room.
Step 3: Chilling for the Perfect Texture
Slide that baking sheet into the freezer for at least thirty minutes right now.
This step is non-negotiable because warm peanut butter will melt into your hot chocolate.
You want these centers to be rock solid before they take their chocolate bath.
Use this time to clean up your workspace or grab a cold beverage.
Patience here ensures your peanut butter chocolate treats look professional and sharp.
Step 4: Melting the Chocolate Coating
Place your milk chocolate chips into a microwave-safe bowl for easy, quick melting.
Heat them in thirty-second bursts, stirring well after every single interval you run.
Stir in a teaspoon of vegetable oil if you want a thinner, shinier coating.
Stop heating once the chocolate is mostly melted and stir until it becomes silky.
Overheating chocolate is a disaster, so go slow and keep a close eye.
Step 5: Dipping and Setting Your Treats
Drop one chilled egg into the melted chocolate and flip it with a fork.
Lift it out carefully, tapping the fork on the bowl to shed excess chocolate.
Slide the coated egg back onto the parchment paper with a gentle touch.
Let them sit for ten minutes or pop them in the fridge to set.
Once the shells are firm, your Easter treats are officially ready for devouring.
Tips for Success
My first attempt at these was a sticky mess, but I learned a few tricks.
Follow these quick pointers to ensure your Homemade Peanut Butter Eggs turn out perfect every time.
- Use a fork for dipping to let the extra chocolate drain through the tines.
- If the dough sticks to your hands, lightly dust your palms with powdered sugar.
- Keep the peanut butter centers frozen until the very second you are ready to dip.
- Store the finished eggs in the fridge to maintain that satisfying chocolate snap.
Essential Kitchen Tools
You don't need a high-end culinary studio to pull off these Homemade Peanut Butter Eggs.
I usually just grab whatever is clean in my kitchen and get to work.
- Mixing Bowl: A large glass or stainless steel bowl works best for the dough.
- Baking Sheet: Any flat tray will do; even a large plate works in a pinch.
- Parchment Paper: Essential for non-sticking, though wax paper is a fine backup.
- Dipping Tool: A standard dinner fork is the ultimate tool for draining excess chocolate.
- Microwave-Safe Bowl: Use ceramic or glass to melt your chocolate chips evenly.
Flavor Variations for Homemade Peanut Butter Eggs
I’ve spent many late nights experimenting with these in my kitchen to keep things fresh.
While the classic version is king, swapping a few ingredients can create a whole new experience.
- Dark Chocolate Decadence: Use 70% cocoa chips for a sophisticated, less sugary bite that adults love.
- The Crunchy Factor: Swap creamy for extra-crunchy peanut butter to add a satisfying, rugged texture.
- White Chocolate Dream: Coat your Homemade Peanut Butter Eggs in white chocolate for a creamy, buttery finish.
- Salted Caramel Twist: Sprinkle a pinch of flaky sea salt on top before the chocolate shell sets.
- Protein Power: Mix in a scoop of vanilla protein powder for a post-workout version of this treat.
- Almond Joy Vibes: Use almond butter instead of peanut butter and press a whole almond on top.
Serving Suggestions
I love bringing these out during a weekend barbecue or as a late-night reward.
Presentation is everything when you are showing off your Homemade Peanut Butter Eggs to friends.
- Pair these rich treats with a glass of cold milk or a robust, dark roast coffee.
- Arrange them on a wooden serving board alongside fresh apple slices for a crisp contrast.
- Crush one over a bowl of vanilla bean ice cream for an instant, decadent sundae.
- Wrap them in small cellophane bags with a ribbon to create impressive, edible gifts.
FAQs about Homemade Peanut Butter Eggs
I get a lot of questions whenever I bring a batch of these to a neighborhood cookout.
Making candy at home can feel a bit like a science experiment gone wrong at first.
I have gathered the most common hurdles to help you stay on the right track.
These answers will ensure your Homemade Peanut Butter Eggs turn out flawless and delicious every time.
How should I store my Homemade Peanut Butter Eggs?
I always suggest keeping these treats in an airtight container inside your refrigerator.
The cool air keeps the peanut butter chocolate shell crisp and prevents the center from softening.
They will stay fresh for about a week, though they rarely last that long at my house.
If you want to save them for later, they actually freeze beautifully for up to three months.
Can I use crunchy peanut butter instead of creamy?
You absolutely can use the crunchy variety if you prefer a bit of rugged texture.
It adds a nice contrast to the smooth chocolate coating and feels a bit more substantial.
Just keep in mind the centers might be slightly more fragile when you are shaping them.
It is a popular no-bake dessert twist for those who find creamy fillings a bit too plain.
Why is my peanut butter dough too soft to shape?
This usually happens if your kitchen is warm or the butter was a bit too melted.
The easiest fix is to toss the dough into the fridge for about fifteen minutes.
Chilling the mixture allows the fats to firm up, making the dough much easier to handle.
You can also add a tablespoon of powdered sugar to help absorb any excess moisture quickly.
Working with cold dough is the secret to getting those perfect Easter treats every single time.
Final Thoughts
There is something deeply satisfying about mastering a classic treat in your own kitchen.
I find that making Homemade Peanut Butter Eggs is more than just a simple baking project.
It is about reclaiming those nostalgic flavors and sharing something handmade with the people who matter.
Whether you are prepping for a holiday or just satisfying a late-night craving, these hits the spot.
The balance of salty peanut butter and rich chocolate is a timeless duo that never fails.
Grab your mixing bowl, enjoy the process, and watch how quickly these disappear from the plate.
PrintHomemade Peanut Butter Eggs: Easy 5-Ingredient Way
A simple and delicious 5-ingredient recipe for homemade peanut butter eggs, featuring a smooth, creamy peanut butter center coated in rich milk chocolate.
- Prep Time: 20 minutes
- Cook Time: 5 minutes
- Total Time: 55 minutes
- Yield: 18-20 eggs 1x
- Category: Dessert
- Method: No-Bake
- Cuisine: American
- Diet: Vegetarian
Ingredients
- 1 cup creamy peanut butter
- ½ cup powdered sugar
- ¼ cup unsalted butter, softened
- 1 teaspoon vanilla extract
- ¼ teaspoon salt
- 2 cups milk chocolate chips
- 1 tablespoon vegetable oil (optional)
Instructions
- In a large mixing bowl, combine the creamy peanut butter, powdered sugar, softened butter, vanilla extract, and salt until a smooth, thick dough forms.
- Line a baking sheet with parchment paper. Scoop about 1 tablespoon of the mixture, roll into an egg shape, and place on the sheet.
- Freeze the shaped eggs for 30 minutes to firm up.
- Melt the milk chocolate chips in a microwave-safe bowl in 30-second intervals, stirring until smooth. Stir in vegetable oil if a thinner coating is desired.
- Dip each chilled egg into the melted chocolate to coat completely. Use a fork to lift them out and let excess chocolate drip off.
- Place back on the parchment paper and let sit for 10 minutes (or refrigerate) until the chocolate is fully set.
Notes
- Store in an airtight container in the refrigerator for up to one week.
- Use a fork to dip the eggs to ensure an even coating and to let excess chocolate drain easily.
- If the dough is too soft to handle, chill it for 15 minutes before shaping into eggs.
Nutrition
- Serving Size: 1 egg
- Calories: 185
- Sugar: 12g
- Sodium: 85mg
- Fat: 13g
- Saturated Fat: 6g
- Unsaturated Fat: 7g
- Trans Fat: 0g
- Carbohydrates: 16g
- Fiber: 1g
- Protein: 3g
- Cholesterol: 7mg
Keywords: Homemade Peanut Butter Eggs, No-Bake Dessert, Peanut Butter Chocolate, Easter Treats