Introduction
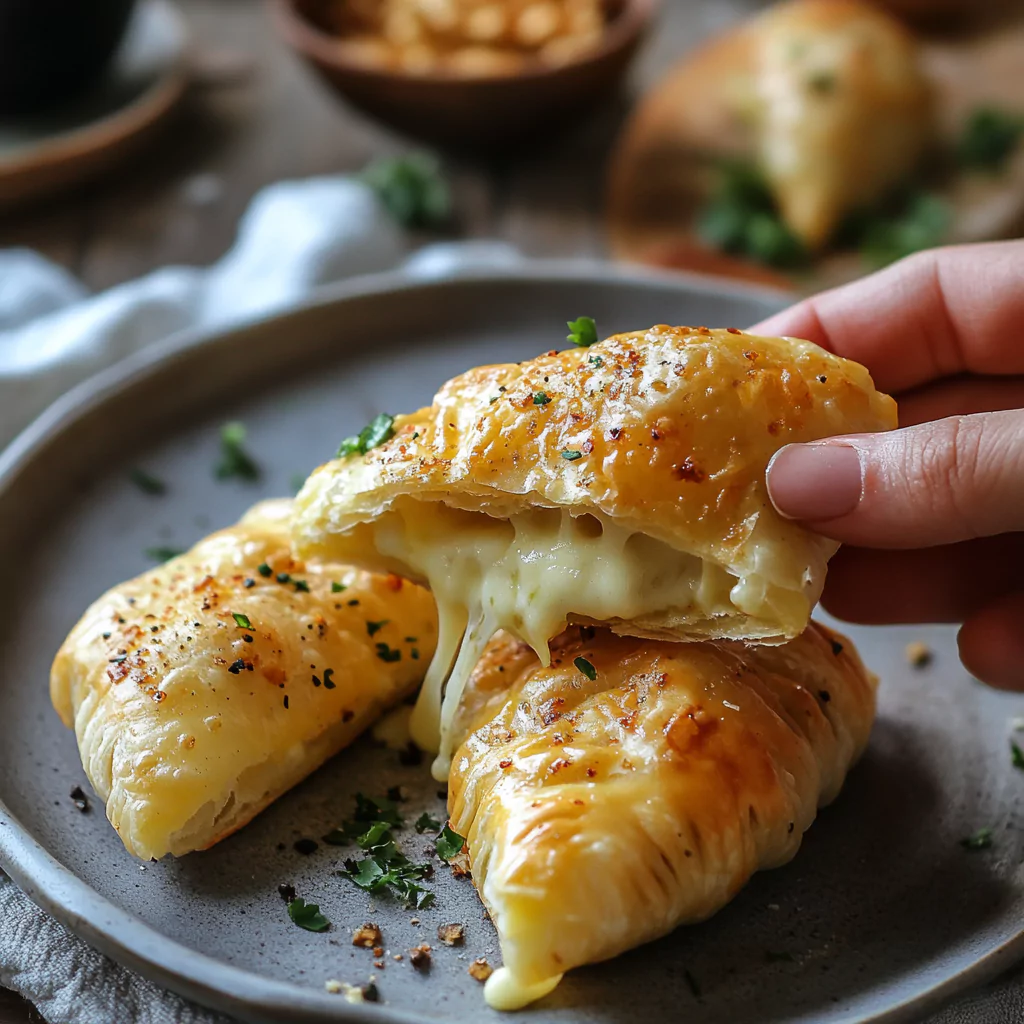
If you’re looking for a quick, cheesy, and utterly satisfying snack, these Cheesy Snack Pockets are exactly what you need. Imagine warm, golden pastry filled with gooey, melted cheese — crisp on the outside, soft and melty on the inside. These little pockets are like the cozy food hug you didn’t know you were craving. Perfect for after-school snacks, lazy weekend lunches, or even a fun party appetizer. And here’s a fun one: snacks like this have been a favorite in many cultures, from Italian calzones to Latin empanadas — and this version is all about simplicity and cheesy comfort.
Pro Tip
For an extra golden, glossy finish, brush the tops of your snack pockets with a beaten egg before baking. It adds both color and a subtle crispness.
Serving Suggestions
- With Tomato Soup: These are excellent dunked in a bowl of warm, creamy tomato soup for a comforting meal.
- Snack Platter: Serve alongside a few crunchy veggies and dipping sauces like ranch or marinara for an easy snack board.
- Party Favorite: Cut them into smaller portions and serve them as finger food at gatherings or movie nights.
Variations
- Meaty Option: Add a slice of cooked ham, pepperoni, or shredded chicken before sealing for a heartier snack.
- Spicy Twist: Mix some chopped jalapeños or a sprinkle of chili flakes into the cheese filling for a kick.
- Vegetarian Upgrade: Toss in some sautéed mushrooms, spinach, or caramelized onions for extra flavor and nutrition.
- Different Cheeses: Try mozzarella for that stretchy pull, or use sharp cheddar for a tangier taste.
Equipment Needed
- Baking Sheet – Provides an even surface for baking the snack pockets.
- Rolling Pin – Helps roll out the pastry dough evenly.
- Knife or Pizza Cutter – For cutting the dough into portions.
- Fork – Useful for sealing the edges of the pockets securely.
- Pastry Brush (Optional) – Great for applying that shiny egg wash on top.
Tips for Success
- Seal Well: Use a fork to crimp the edges firmly so the cheese doesn’t ooze out during baking.
- Don’t Overfill: It’s tempting, but too much filling will make them hard to seal.
- Chill the Dough: If your dough starts getting too soft, pop it in the fridge for 10–15 minutes before continuing.
- Vent Holes Help: Prick the tops of the pockets with a fork to let steam escape and prevent puffing up too much.
- Cool Slightly Before Eating: The filling will be very hot right out of the oven, so let them cool for a few minutes before digging in.
Why You’ll Love This Recipe
These Cheesy Snack Pockets are everything we love about good snacks: crispy, melty, warm, and endlessly customizable. They’re easy enough for a quick lunch but special enough to serve to friends and family. Plus, they’re freezer-friendly, meaning you can have them ready whenever that cheesy craving strikes.
Recipe Card
Servings: 6 snack pockets
Prep Time: 15 minutes
Cook Time: 18–22 minutes
Total Time: 35–40 minutes
Ingredients
- 1 sheet puff pastry (thawed if frozen)
- 1 cup shredded cheese (cheddar, mozzarella, or your favorite)
- 1 egg (for egg wash)
- 1 tablespoon water
- Optional: pinch of salt, pepper, or spices for seasoning
Instructions
- Preheat your oven to 400°F (200°C) and line a baking sheet with parchment paper.
- Roll out the puff pastry on a lightly floured surface and cut into 6 equal rectangles.
- Sprinkle cheese over half of each rectangle, leaving a border around the edges.
- Fold the pastry over to cover the cheese, forming a pocket. Press edges together with a fork to seal.
- Whisk together the egg and water. Brush the tops of each pocket with the egg wash.
- Prick the tops with a fork to let steam escape during baking.
- Bake for 18–22 minutes, or until golden brown and puffed.
- Let cool slightly before serving.
Nutrition Table (Per Serving, Estimated)
| Nutrient | Amount |
|---|---|
| Calories | 240 kcal |
| Protein | 7 g |
| Carbohydrates | 16 g |
| Fat | 16 g |
| Fiber | 1 g |
| Sugar | 1 g |
| Sodium | 260 mg |
FAQ
1. Can I make these ahead of time?
Yes! Assemble them up to 1 day ahead, cover, and refrigerate until ready to bake.
2. How should I store leftovers?
Cool completely, then store in an airtight container in the fridge for up to 3 days.
3. Can I reheat them?
Definitely. Reheat in a 350°F (175°C) oven for 8–10 minutes to bring back that crispness.
4. Can I freeze them?
Yes. Freeze unbaked pockets on a tray, then transfer to a freezer bag. Bake from frozen, adding a few extra minutes to the baking time.
5. What dough alternatives can I use?
You can use pie dough or crescent roll dough for a different texture and flavor.