Introduction to Mini Taco Salad Jars: Fun Back to School Lunches
Just yesterday, my daughter Claire unexpectedly dropped by right after school, her two kids, Alex and Mia, bubbling with excitement as they ran through the door. They had just returned from their first day of classes after the summer break, and you can imagine the energy in the kitchen! As I set the kettle on for a fresh pot of tea, I heard the kids talk about their favorite lunches so far this week. Claire mentioned how her kids had been enamored by these layered taco salad jars they’ve been seeing and chatting about at school. With laughter and queries about what we were having for dinner, I realized this was the perfect opportunity for me to whip up something special: mini taco salad jars!
Reflecting on my family’s love for all things taco, whether it was taco nights around the dining table or the delicious smells wafting through the air during family gatherings, my excitement grew. These jars are a modern twist on traditional taco salads; colorful, easy to prepare, and perfect for lunches on the go. Plus, they bring a playful element to lunchtime that kids love! I can practically hear them begging for these delightful, portable taco salads. They’re also hugely customizable, so you can switch things up each week without getting bored.
As I gathered the ingredients, I thought back to when my own children were young and how difficult it could be to find meals that they were both excited about and well-balanced. It was chaotic, but those were special moments that instilled traditions for our family meals. Fast forward to today, and the concept of layered salads in a jar really appeals to me because it allows for creativity in a simple package while also teaching kids to appreciate healthy eating! These mini taco salad jars are not just food; they represent nourishment, love, and connection in the family, and I can't wait to share my take on them with you.
Whether you’re prepping for a busy week or packing a fun lunch for the kids, come along as I walk you through this easy and colorful recipe – it’s bound to become a new favorite in your household!
Why You'll Love This Mini Taco Salad Jars: Fun Back to School Lunches
These mini taco salad jars are fully customizable, allowing each person to pick their favorite toppings. Whether that’s extra salsa, more cheese, or even jalapeños, each jar can be a fun reflection of individual tastes.
They are perfect for back-to-school lunches; you can prepare them ahead of time and they travel exceptionally well in a lunch bag or backpack. No more worrying about messy lunches; they're all contained in a jar!
Layered salads are not only visually appealing, but they also present an exciting experience. The crunchiness of fresh vegetables, paired beautifully with the flavors of seasoned meat, creates an irresistible experience that everyone enjoys.
Ingredients Mini Taco Salad Jars: Fun Back to School Lunches
For these mini taco salad jars, we want to use fresh and vibrant ingredients while keeping things simple and enjoyable. I like to start with lean ground beef because it provides a good source of protein without feeling overly heavy. Adding colorful bell peppers not only boosts the nutrition but also adds beautiful layers to the jars. What's nice about the layering technique is that it keeps everything fresh and crunchy until you're ready to eat. Combine that with creamy avocado for its rich texture, and you have a delicious balance of flavors and colors!
- 1 pound (450g) lean ground beef
- 1 packet (1 oz/28g) taco seasoning
- 1 medium (150g) bell pepper, diced
- 1 cup (150g) cherry tomatoes, halved
- 1 cup (75g) shredded lettuce
- 1 cup (240g) black beans, rinsed and drained
- 1 avocado, diced
- 1 cup (100g) shredded cheese (cheddar or Mexican blend)
- ½ cup (120g) salsa
- 4 wide-mouth mason jars (16 ounces/470 mL)
How to Make Mini Taco Salad Jars: Fun Back to School Lunches
Cooking the Beef
To kick things off, grab a medium skillet and set it over medium heat. Add the ground beef to the pan and, using a wooden spoon, break it apart as it cooks. In my experience, this part never fails to remind me of taco nights from years ago when my kids were little. Each sizzle and pop would fill the house with a hearty appeal! As the beef cooks, it will turn from a soft pink to a robust brown, and you’ll also see some juice start to render out which is normal.
It usually takes about 7-10 minutes for the beef to fully brown. When it's close to done, you'll want to drain any excess fat. I often do this over a colander to avoid dumping any precious beef along with it! After the fat is drained, sprinkle the taco seasoning over the meat; the aroma that hits you is just so inviting! Pour in about a third of a cup of water, giving everything a good stir. This step is vital as it allows the seasoning to meld beautifully with the beef. Let this simmer for another 5 minutes until it thickens slightly and all those Tex-Mex flavors are infused in the meat. The kitchen smells fantastic at this point!
Preparing the Ingredients
While the beef is simmering and your kitchen is scented with those lovely taco spices, it's time to prep the rest of your ingredients. Start by washing and dicing your bell pepper into small, colorful bites; I choose red and yellow peppers for that bright pop! You can also get the kids involved in this step. I loved having my grandkids help me with the preparation; they enjoy the vibrant colors and often share how they’ll layer the ingredients in their jars. The excitement in their voices makes simple tasks enjoyable!
Next, I like to halve the juicy cherry tomatoes, which add a burst of sweetness in every bite. Rinse the black beans and let them drain in a colander, too. Their slightly earthy flavor adds a lovely depth to the overall taste of the salad. You can almost feel the excitement building as the next step approaches; soon, you’ll have a palette of colors ready to assemble! Also, for cheese lovers like myself, don’t forget to have a generous amount of shredded cheese on hand. It melts beautifully as these jars layer, offering that comforting cheesy texture you can't resist.
Layering the Jars
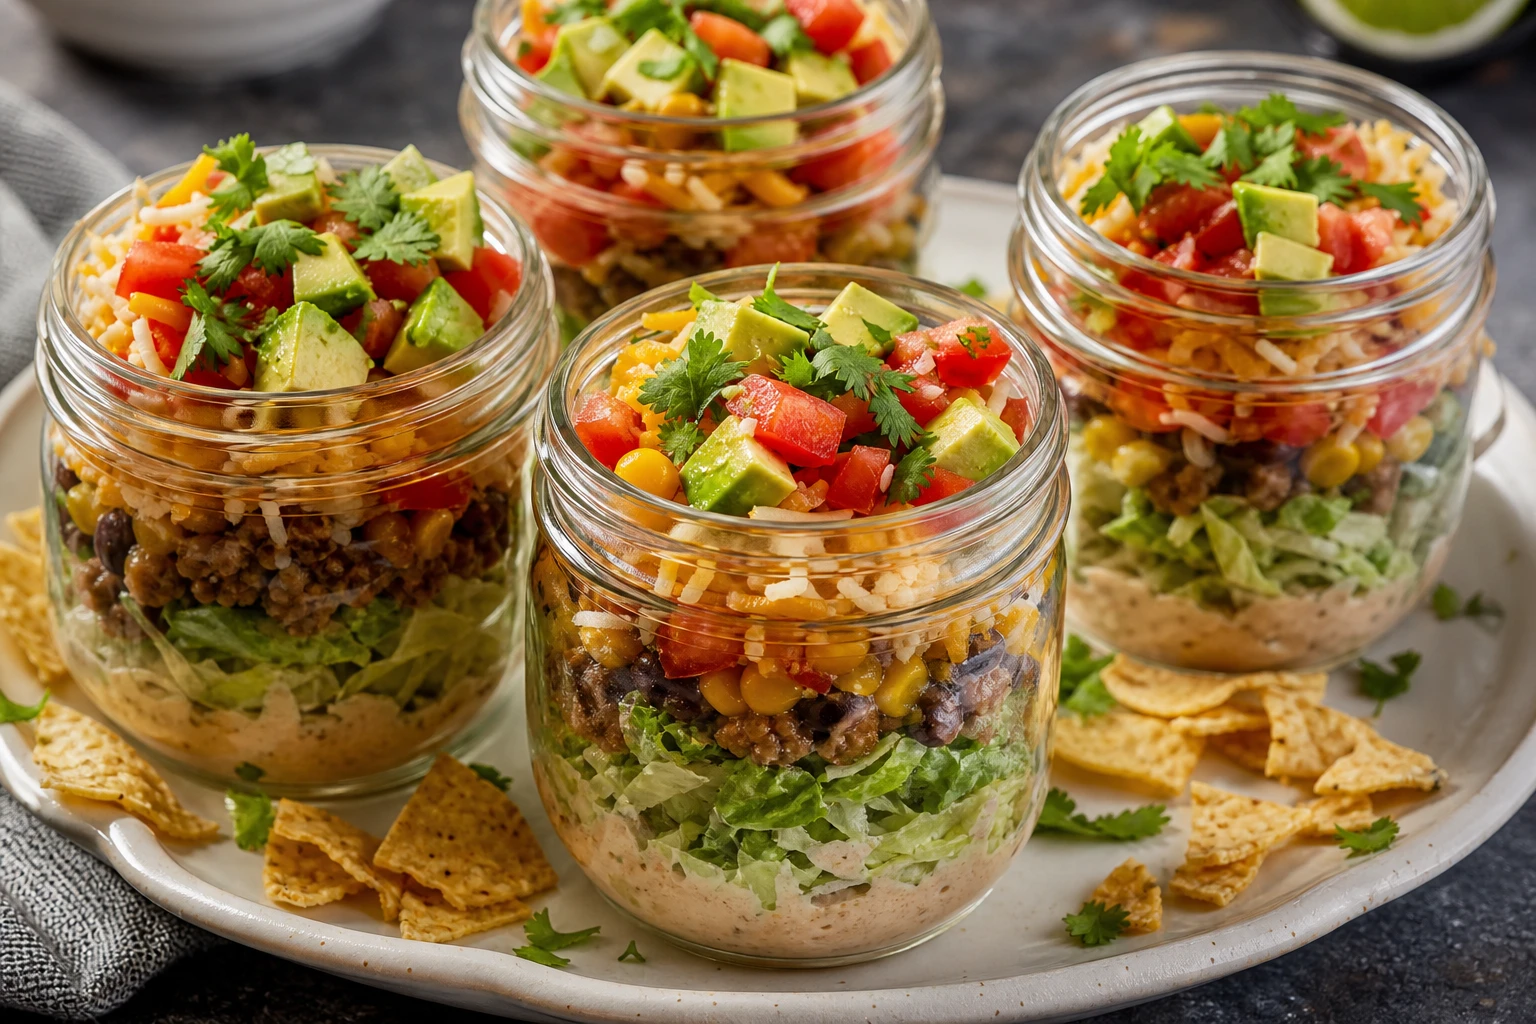
Now it’s time for the fun part—building our mini taco salad jars! Begin by grabbing those mason jars, which I adore for their sturdiness and the cute factor they bring to the table. Start with about a tablespoon of salsa at the base of each jar; this adds flavor and provides a moist base for the ingredients to adhere to. I like to use a spoon, but you could also squeeze the salsa straight from the bottle if that’s easier!
Next, scoop about a quarter cup of your seasoned beef on top of the salsa layer. Just look at that beautiful, savory beef! On top of that, layer the diced bell peppers, followed by a generous scoop of black beans. A handful of shredded lettuce comes next, creating a delightful crunch and adding vibrant green color as well. Then sprinkle in your halved cherry tomatoes; they bring brightness and flavor. Don’t forget to top it all off with your diced avocado—its creamy texture is vital to the mix! You’ll see how the layers create a rainbow in each jar, and oh, the anticipation waiting to dig in is exciting!
Finishing Touches and Topping
For the final touches, add a generous sprinkling of shredded cheese on top of each jar. For those who love a little spice, you could even sprinkle in some diced jalapeños at this stage! After ensuring the ingredients are tightly stacked together, secure the lids on your jars. It’s like sealing your little treasure of flavors until it’s time to eat.
The best part? You can store these mini taco salad jars in the fridge for up to 5 days! I often prepare a batch on Sunday evenings while catching up with my husband, and it truly makes weekday lunches a breeze. Every time you open one of these jars, the burst of colors and textures remind you of summer picnics and delightful family gatherings, bringing a smile to your face as you dive into a delicious, healthy meal!
Tips for Success
- Feel free to substitute ground turkey or chicken for a lighter protein option. Ground turkey provides similar flavors with slightly less fat.
- You can add corn or swap the black beans for pinto beans, chickpeas, or even lentils for a different flavor and texture. Each bean adds its unique charm.
- Always place wet ingredients like salsa at the bottom of the jar to prevent the other ingredients from becoming soggy.
- These jars can be made ahead and stored in the refrigerator, perfect for busy mornings. Individual servings ready to go can save you time and energy during the week.
- Avoid adding avocado until you're ready to eat to keep it from browning too quickly; lime juice can also help if you’d like it in the jar. Remember, the fresher everything is, the better the flavor!
- Mix in a dollop of sour cream or Greek yogurt on top for added creaminess if you enjoy rich flavors.
- Feel free to customize your layers with any ingredients you have on hand; leftovers can work wonderfully in these jars.
Equipment Needed
- Medium skillet
- Mason jars (wide-mouth)
- Cutting board
- Sharp knife
- Measuring cups
- Wooden spoon
Variations of the Mini Taco Salad Jars: Fun Back to School Lunches
- Add cooked quinoa or rice to the layers for added heartiness and to expand on the flavors. This can make the dish more filling for a larger appetite.
- Use grilled chicken instead of beef for a different protein; marinaded, grilled chicken can impart a delightful smoky flavor.
- Incorporate diced jalapeños or hot sauce in the layers for individuals who enjoy a spicy kick with their taco salad.
- Substitute Greek yogurt for sour cream to make it healthier; it's a great alternative that still gives the same creamy texture.
Serving Suggestions
- Serve with tortilla chips or corn chips on the side for extra crunch, making your meal even more delightful.
- Pair with freshly made guacamole on the side for a tasty twist that complements the flavors in the salad jars perfectly.
- Include a fruit cup or mixed veggies for a balanced lunch that adds even more nutrition along with the hearty taco jars.
- Offer a refreshing drink, like homemade lemonade or iced tea, to wash all the fabulous flavors down just right!
- For a gathering, make a taco salad station with these jars laid out for guests to pick their layers – a fun, interactive way to enjoy taco flavors together.
Nutrition
Serving size: 1 jar | Calories: 450 | Protein: 25g | Carbs: 35g | Fat: 25g
FAQs about Mini Taco Salad Jars: Fun Back to School Lunches
Can I make these ahead of time?
Absolutely! These mini taco salad jars can be prepared up to 5 days in advance, making them perfect for meal prep. Just ensure they’re stored in airtight jars in the refrigerator to keep everything fresh and delicious over several days.
What kind of protein can I use in this recipe?
You can use various proteins according to your taste preference! Ground turkey, shredded chicken, or even a plant-based protein like lentils or beans works well. Each option brings its unique flavors while maintaining the essence of a taco salad.
How do I prevent the avocado from browning?
To keep your avocado from browning, it’s best to add it right before eating or sprinkle some lime juice on it, as the acidity helps slow down oxidation. Both methods work well, but I personally prefer the freshness of adding it last.
What if I don’t have mason jars?
No worries if you don't have mason jars! You can use any airtight container with a lid. Just make sure to layer the ingredients thoughtfully to keep them fresh and tasty until you’re ready to dig in!
Final Thoughts
I truly hope you enjoy making these mini taco salad jars as much as I do! They bring a nutritious twist to lunchtime fun and are perfect for both kids and adults. Feel free to mix and match ingredients to suit your family's tastes, and don't forget to share your creations with friends. Happy cooking!
Recipe card
Mini Taco Salad Jars: Fun Back to School Lunches
Try these mini taco salad jars for a fun, healthy lunch that kids will love! Easy...
✿
Prep
0 min
Cook
0 min
Total
0 min
Serves
1
Calories
450
Protein
25g
Carbs
35g
Fat
25g
Calories are per serving and stay the same when you scale servings above -- only ingredient amounts adjust.
Ingredients
Instructions
✿
www.mealsmell.com