Introduction to No-Knead Turkish Bread Recipe - Only 3 Ingredients
Today was a delightful whirlwind in my kitchen. My lively grandson Lucas, with his bright eyes and endless curiosity, arrived bursting with energy, eager to share tales from his classroom. He recently embarked on a culinary exploration of international cuisines and, oh, how his face lit up when he mentioned the wonders of Turkish bread. Those soft, fluffy rounds called Bazlama captivated his young imagination. He rushed over, plopping down a stack of books, filled with color photos, smudged with fingerprints from all the pages he had flipped through, including a recipe that looked almost magical to him.
As I watched him excitedly recount his classroom experience, a wave of nostalgia washed over me. I couldn't help but think of my childhood, spent in my mother’s kitchen, where warm aromas of freshly baked bread would entwine with laughter and family chatter. I would sit on a stool, my feet swinging beneath me as I watched her knead dough, creating lovely memories with each floured handprint and gentle poke. The thought of sharing that experience with my grandson brought a smile to my face. I knew right then that we needed to make No-Knead Turkish Bread together, a recipe that links my past and present.
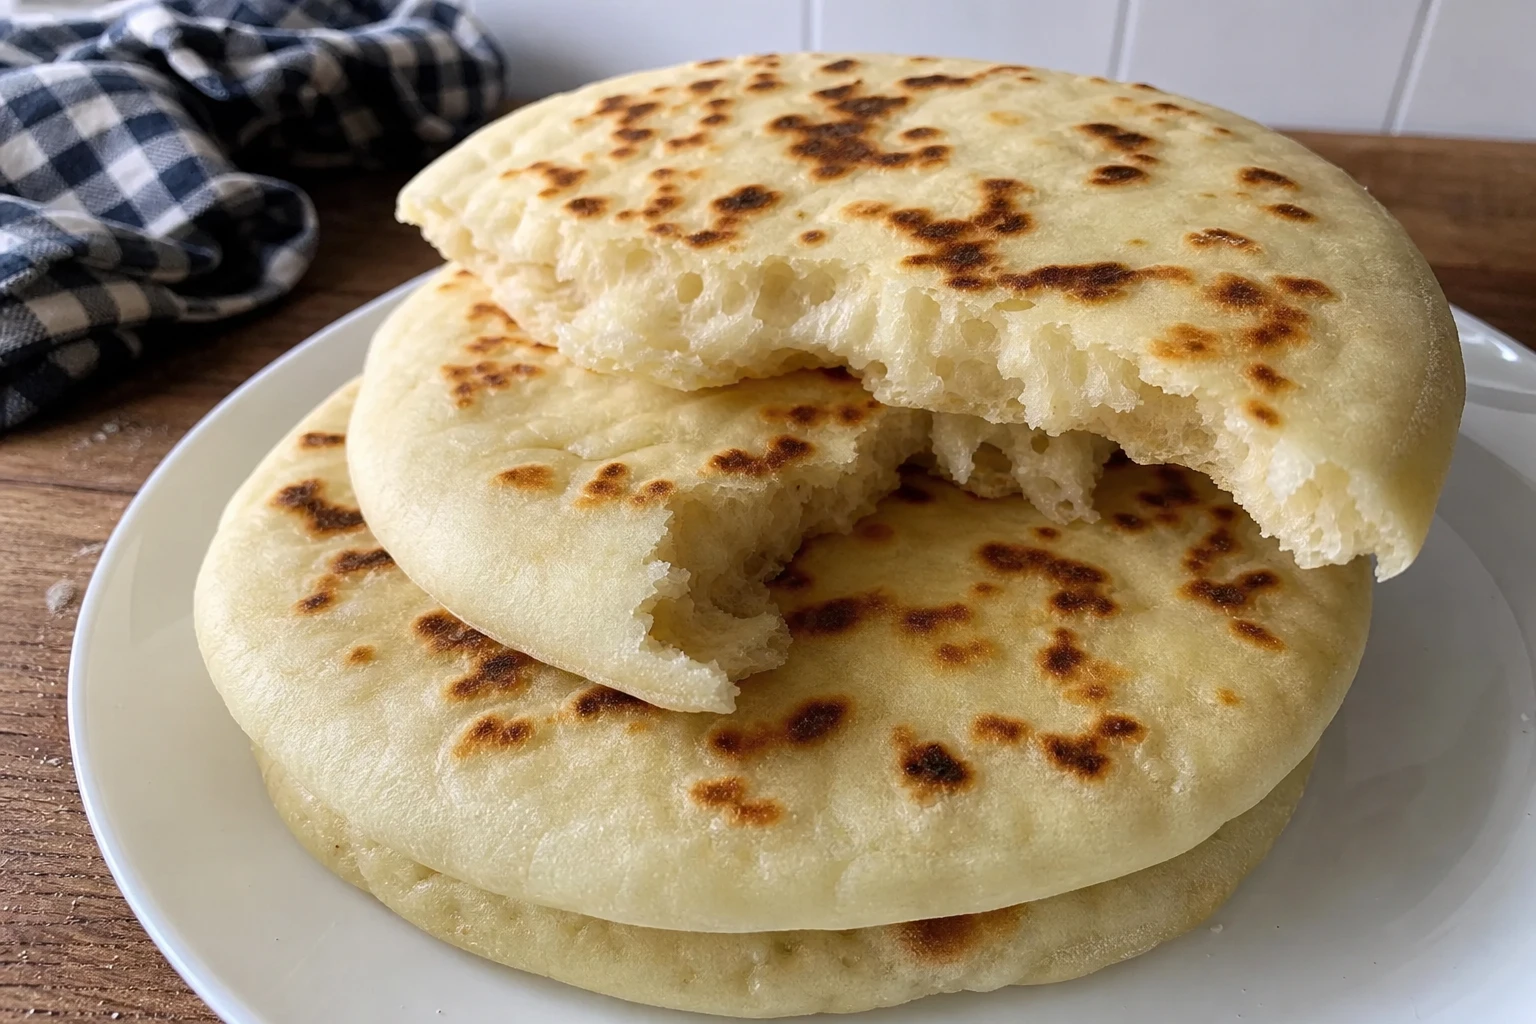
What makes this bread truly special is its simplicity—just three ingredients! It’s stunningly easy and requires only minimal effort while yielding maximum satisfaction. When cooked, the dough transforms into pillowy-soft layers, with that delightful scent wafting through the air as it bubbles and puffs. This bread is perfect for smearing with butter, dipping in hearty soups, or simply enjoying warm with cheese. Whether it's a casual weeknight family dinner or a gathering with friends, Bazlama brings people together and ignites conversation.
Let’s gather our ingredients and step into the kitchen to create this delightful No-Knead Turkish Bread, an experience I cherish sharing with Lucas!
Why You'll Love This No-Knead Turkish Bread Recipe - Only 3 Ingredients
This No-Knead Turkish Bread is incredibly quick and easy to make, perfect for busy weeknights or when unexpected guests drop by. Who has time for elaborate bread-making rituals these days? The beauty of this recipe lies in its simplicity; it requires no kneading, making it a breeze to whip up fresh bread without taxing your time or energy. You can make it while multitasking or keeping an eye on kids, and it will still turn out beautifully!
The flavor of this bread is absolutely incredible! With each bite, you’ll sink your teeth into a delightfully soft interior enveloped in a slightly chewy, yet light crust. The bread absorbs any toppings beautifully, enhancing the flavors of dips, soups, or whatever you decide to pair with it. Oh, and that wonderful aroma wafting through your kitchen? Simply divine! It’s a scent that evokes warmth, love, and home, instantly making you feel like you’ve stepped back into a cozy haven.
It’s a wonderful way to get kids involved in the kitchen. Lucas was absolutely thrilled to help, and you can bet that his hands were covered in flour before we finished. Baking together fosters creativity; it's more than just cooking—it's about exploring and having fun. Plus, everyone enjoys the bread as it comes from a family experience, creating memories that will last a lifetime. Watching that little face light up as the bread puffed in the skillet was priceless!
Ingredients No-Knead Turkish Bread Recipe - Only 3 Ingredients
To make this No-Knead Turkish Bread, you'll only need just three simple ingredients. It’s as straightforward as it gets! First on the list is high-quality all-purpose flour, a must for achieving that perfect texture. If you can find a flour that has a bit more strength, perhaps a bread flour or a blend, it could lend an even better chew and height to your bread. Then we have warm water—this is crucial as it helps to activate the dough without overheating and killing any natural yeast that might be present if you use a flour blend. Finally, a hint of salt to bring balance to the bread's flavor and enhance that lovely aroma. Remember, I always prefer to use filtered water when baking, as it tends to yield a cleaner taste and allows the bread's true flavor to shine through.
- 2 cups (250g) all-purpose flour
- ¾ cup (180ml) warm water
- 1 teaspoon salt
How to Make No-Knead Turkish Bread Recipe - Only 3 Ingredients
Mixing the Dough
To start, gather your flour, warm water, and salt. In a large mixing bowl, combine the flour and salt, whisking it briefly. The scent of the flour is fresh and comforting! Slowly pour in the warm water, and you can almost hear that gentle splash as it mingles with the flour. Using your fingers or a wooden spoon, stir until the mixture begins to come together, forming a shaggy, slightly sticky dough. I always encourage my grandkids to really dig their hands in, feel what the dough is like, and even express their thoughts about how it feels! This creates such a fun and tactile experience that they absolutely adore.
As you mix, I love to remember that bread-making brings a little magic to the kitchen. The moment those dry and wet ingredients meet, there’s a beautiful transformation happening. You might want to cover the bowl with a damp dish towel and let it rest for about 15-20 minutes. This helps the flour to hydrate which produces a wonderfully elastic dough, making it much easier to handle while maintaining those soft, tender qualities you want in Bazlama. When the dough has rested, you’ll notice how it has loosened a bit, it’s almost like giving it a mini spa treatment!
Shaping the Bread
Once your dough has rested, it’s showtime! Lightly dust your countertop with a bit of flour, getting ready to turn out that lovely, puffy dough. With your floured hands, gently turn it out onto the floured surface. There’s no need to knead here; instead, let your fingers work their magic as you shape it into a round or oval, however you feel inspired. Keep it relaxed—it should feel tender and light. As you're shaping, I often reminisce about the time when my mother used to let me press and shape the dough; it was like art, only tastier!
After shaping, place your dough onto a floured area and cover it with a clean towel while you prepare your cooking pan. This allows it to rise a bit more. You'll watch it slowly puff up; it's almost like watching my little grandson grow up right before my eyes! When life gets busy, these moments of making something together are truly golden. The delightful anticipation builds as you know there’s something tasty coming to the table.
Cooking the Bread
Now for the fun part! I love the irresistible moment when you cook it. Heat a non-stick skillet over medium heat, and when it’s warm, carefully place the dough into the skillet. As it touches the hot surface, listen closely—you should hear a gentle sizzle, it’s music to a cook’s ears, isn't it? Allow the bread to cook for about 4-5 minutes on one side until it becomes beautifully golden brown and puffed up. You’ll catch the sweet aroma drifting through the room, coaxing everyone into the kitchen to investigate what's happening!
Once the first side is done, flip the bread over, revealing a lovely, golden surface, and allow it to cook on the other side for another 4-5 minutes. As the second side sees the skillet, it will puff up even further, creating that signature bubble we all love. The scent will envelop the kitchen, and it will feel like a warm hug wrapping around you. Once both sides are golden brown, remove it from the skillet and let it cool on a wire rack. Doing this allows a bit of airflow to keep it from getting soggy while you admire the beauty of your creation!
Tips for Success
- Ensure your water is warm, not hot. Hot water can kill the yeast, while cold water won’t activate it properly, leading to a dense dough that doesn’t rise as it should.
- If the dough feels too sticky, add small amounts of flour until it's manageable, but be careful not to overwork it. It should feel soft to the touch yet not overly tacky—it's all about finding that sweet spot!
- You can experiment with different flours for unique flavors; whole wheat or spelt can add a nutty touch. Just be mindful that different flours may alter the water quantity needed slightly due to their absorbency.
- Serve the bread warm for best results; it pairs beautifully with butter, hummus, or oil for dipping—perfect for family gatherings or cozy nights in.
- Store any leftover bread in an airtight container at room temperature; it stays fresh for up to two days. For longer storage, you can freeze it for up to a month. Just pop it in the toaster for a quick warm-up!
- For a touch of decadence, consider brushing the bread with garlic-infused oil just before serving. It’s an excellent way to elevate this simple yet delicious bread!
- If you like a bit of stretch in your bread, consider rolling it out a bit thinner when shaping it; the thinner you go, the more puff you’ll have when cooking.
Equipment Needed
- Large mixing bowl
- Non-stick skillet
- Measuring cups
- Measuring spoons
- Flour sifter or whisk
- Clean dish towel
Variations of the No-Knead Turkish Bread Recipe - Only 3 Ingredients
- Add herbs such as rosemary, thyme, or garlic powder to the dough for a flavorful twist. Fresh herbs also work beautifully if you have them on hand.
- Incorporate cheese into the dough for a cheesy classic; feta or shredded mozzarella can enhance the flavor profile significantly.
- Top the bread with seeds like sesame, poppy seeds, or za'atar before cooking for added texture and flavor.
- Instead of cooking in a skillet, try using a grill for a lovely smoky flavor; just keep an eye on it to prevent burning.
- For a sweet version, add cinnamon and sugar to the dough and serve with fruit spreads—imagine an afternoon treat with honey or jam!
Serving Suggestions
- Pair this bread with a steaming bowl of flavorful lentil soup for a comforting meal on chilly nights.
- Serve it alongside hummus, tzatziki, or baba ghanoush for a delightful appetizer platter that everyone will love.
- Use the bread to make wraps or sandwiches filled with fresh veggies, grilled meats, or chicken salad—it’s so versatile!
- Enjoy the bread with butter and jam for a lovely breakfast or brunch treat, or whip up some fresh seasonal fruit compote to elevate it further!
- It’s also great for mopping up rich sauces from your favorite stews or curries; it enhances the meal while soaking up all those delicious flavors.
Nutrition
Serving size: 1 piece (about 100g) | Calories: 150 | Protein: 4g | Carbs: 30g | Fat: 1g
FAQs about No-Knead Turkish Bread Recipe - Only 3 Ingredients
Can I make this bread in advance?
Absolutely! You can prepare the dough a few hours ahead of time and let it sit covered at room temperature. Just remember, the longer you let it rise, the more flavor will develop; however, do keep an eye on it to ensure it doesn’t overproof.
What if I don't have a non-stick skillet?
If you don't have a non-stick skillet, you can absolutely use a regular frying pan. Just make sure to add a bit of oil or butter to help prevent sticking. A light coating should do the trick and provide an extra flavor punch.
Can I use whole wheat flour?
Yes, whole wheat flour can be used for a nuttier flavor, but it may yield a denser bread than the traditional all-purpose flour. You might need to adjust the water slightly since whole wheat absorbs more moisture, so start with a little less water and add as needed.
What should I do with leftovers?
Any leftover bread can be stored in an airtight container at room temperature for up to two days. If you have leftovers after that, you may want to freeze them. When you're ready to enjoy more, simply toast them on low heat until warmed through, and they’ll be as good as fresh! Just be sure to keep an eye on them to prevent burning.
Is this recipe suitable for children to make?
Definitely! Since it requires no kneading, kids can easily join in on the fun of shaping and cooking the bread. It’s a great activity to foster their interest in cooking and baking, and there’s something special about their little hands creating beautiful food too! Plus, the reward of warm, homemade bread is sure to keep them motivated.
Can I add toppings to the bread before cooking?
Yes! Sprinkling some seeds like sesame or poppy seeds on top just before you place it in the skillet will add a lovely crunch and flavor. You can also experiment with making a herbed oil to brush on top that enhances the flavor profile even more.
What’s the best way to serve this bread?
This Turkish bread is delightful served warm, paired with soups, dips, or simply with some butter. It also makes for a lovely accompaniment to a cheese platter. Experiment with various flavors, and you’ll find your favorite pairing in no time!
Final Thoughts
I hope you enjoy making this No-Knead Turkish Bread as much as Lucas and I did today! It’s a simple, joyful recipe that brings the warmth of family and tradition into your kitchen. Watching the dough puff and bubble in the skillet is not just a cooking moment, but a memory in the making. Don't forget to share it with your loved ones—create your own cherished memories around this delightful bread. Happy baking and enjoy the tastes of home!
Recipe card
No-Knead Turkish Bread Recipe - Only 3 Ingredients
Discover the joy of making No-Knead Turkish Bread with just 3 ingredients! Join me and Lucas...
✿
Prep
10 min
Cook
15 min
Total
25 min
Serves
4
Calories
150
Protein
4g
Carbs
30g
Fat
1g
Calories are per serving and stay the same when you scale servings above -- only ingredient amounts adjust.
Ingredients
Instructions
✿
www.mealsmell.com